Thursday, August 28, 2008

update your look for fall - dark lips

It's that time of year again! With back to school, back to cool (temperatures) and everything that goes with it, chances are that your summer is nearly up.

What with all the changes going on, you might want to think a minute about updating your makeup for fall '08. Fear not, my friends! One of the most stylish and current ways to update your look for fall this year is to look to the dark side - dark lip colour that is.

Dark lips are all over the place for fall. And there are some extreme examples that should be left to the catwalk (slick black patent lips, anyone?). But this dark lip trend can be totally wearable as the weather gets cooler.

Dark Lip Fall 08
from style.com

An easy way to transition is to think of it as deepening the lip colours you already like to wear. Dark plums, reds and chocolate are all popular options that are right on track this season, so there are options for everyone!

You can also play with the finish to suit your comfort. Try a sheer blackberry lip stick or gloss. Blot down your dark creamy lipstick to a stain, for a hint of softness and longer-lasting colour. Or go full-on dark red, which call look especially chic at night.

Pair your dark lip look with a polished face - groomed brows, lush lashes and a hint of cheek colour to keep the complexion fresh. So pretty.

Tuesday, August 5, 2008

makeup for bruises

No one likes to have to deal with bruises, but sometimes they are an unfortunate side effect of the lovely effects of various injectibles (not always!).

Here are a few tricks to concealing bruises:
-prep skin and make sure the area is clean and DRY (you don't want your concealer sliding off a too-moist face)
-opt for a creamy, opaque concealer that comes in a pot or a pan (not the type in a tube, they are usually too sheer)
-choose a concealer that is very close to your natural depth of skintone but with a warm undertone for a purple bruise(the warm/yellow tone helps cancel out the purple of a fresh bruise)
-choose a concealer as close to your own skintone and depth when the bruise is older
-pat the concealer on with a brush directly onto darkest areas first, then feather out into clear skin
-press on a light layer of translucent powder to set (carefully, dont want to lift the concealer) using a velour puff or a sponge

You may repeat with a second layer of concealer and powder if the bruise is very dark, but be VERY careful to not overblend, otherwise you will notice your concealer lifting as you continue your brushstrokes. If it starts lifting on me, I like to pat the area lightly with my finger and then apply a whisper of powder, then try for another layer. If this still doesn't work, I start again.

Tuesday, July 22, 2008

A Look Ahead

Fall is already on my mind. With an eye on things to come, the way ahead seems paved in GOLD.

Lead by makeup maven Peter Philips, new Creative Director for Makeup at Chanel, his debut collection is centred around lovely gilded touches for all. With all the recent hits coming from the house of Chanel (how many people did you know that wore super-dark nailpolish? neon brights?), gold just might be the new black.

Chanel Makeup Fall 08
from butterflydiary.com

Gold is very easy to integrate into your makeup routine and can be so flattering on any skin tone. Why not try a pale gold highlight on cheekbones or browbones? Maybe a soft gold shadow with lots of lush black mascara. Perhaps a pretty lipstick with a gold pearl. Think of the possibilities!

Thursday, May 29, 2008

finishing touches for your eyebrows

For that extra little bit of polish to your makeup look, think about finishing touches for your eyebrows.

For any look, from a natural look to full on glamour, making sure your eyebrows are groomed and defined can make a huge difference.

On those days that you aren't planning on wearing much makeup (like the lazy days of summer), simply combing your brows with a spoolie (clean mascara wand) or a brow comb in an upward and outward direction is great. If your brow hairs are on the unruly side, comb through a little brow wax or even a bit of untinted lip balm to tame and subtly define them.

If you are going to be wearing a stronger makeup look, you can define your brows with either a pencil or a powder. It really is a matter of preference and comfort when choosing your weapon, but there are a few tips I can offer for both:

When choosing a pencil, look for a BROW PENCIL specifically, because they are formulated with the best texture, which is drier than other pencils. Do not fill in your brows with an eyeliner (too creamy) or, heaven forbid, a lip liner (just WRONG - too creamy and usually too warm toned).

If you are more comfortable with a powder, you can use a brow powder specifically, or a matte eyeshadow with a neutral tone. Apply the powder with a small angled brush with firm bristles.

Use short strokes to mimic hairs and fill in following the direction of the hair growth.

As a guideline, blondes should look for a tone similar to their overall hair colour or slightly darker; brunettes should look for a tone similar to their colour or slightly lighter.

from beaut.ie
from beaut.ie

AND MY BIGGEST TIP BY FAR:

Always comb through your brows with a spoolie or brow comb AFTER you have filled them in. This ensures that the edges are softened and look natural. If you feel that you have filled them in too heavily, comb more vigorously, zigzagging side to side as you comb up and out to lift some of the colour and diffuse the effect.

Wednesday, May 7, 2008

curling eyelashes

Curling my eyelashes is a vital step in any of my eye makeup looks. I have fairly straight eyelashes, so I cannot under emphasize the difference made by curling my eyelashes before applying mascara.

The first time I tried curling my eyelashes, I was very excited. I was a little over-zealous with the curling and pinched my eyelid (I was about 10, so mistakes were to be expected). I also squeezed and held the curler clamped shut for far too long (15 seconds, 30 seconds, I don't really remember). My lashes ended up at a 90 degree angle. Needless to say it took a little practice to get it right.

My biggest tip for making the best curl is to "walk the curler" along your eyelashes, and this is a technique specifically for clamp curlers (the most common type). I start by trying to make the first crimp as close to my lash line as possible, without catching my eyelid. I then hold the curler down for a brief moment, up to about 5 seconds. After creating this crimp, I pull the curler out a little bit from the base of the lashes and make a second crimp. Making 2 crimps (or possibly 3 if you can manage it) creates the prettiest and most effective curl, in my opinion.

Try to curl your lashes before you put on mascara, because mascara can make your lashes stick to the crimping pads in the curler, pulling them out.

Good curlers can be found at different price points, although the Cadillac of eyelash curlers is by Shu Uemura. I was lucky enough to receive my Shu for my 18th birthday, which is nice because it retails for around $25. It really is a superior tool, making curling a breeze, and giving the nicest effect.

Shu Uemura eyelash curler
Shu Uemura eyelash curler from shuuemura-usa.com

If you are not looking to spend that much (and I wouldn't blame you), I would try and look for a curler with a metal body (as opposed to plastic) because you can squeeze gently but effectively. I find the plastic ones feel flimsy and don't give enough curl. Sometimes curlers are labelled with different levels of curl, from natural to dramatic. Get the dramatic, because I have found that any of the ones labelled natural don't do much of anything!

You may need to test a few to find the one that fits your eye the best and works the most effectively for you, but I highly recommend you try it!

Friday, May 2, 2008

gloPrecision eye pencils in US Elle

Check out this month's US Elle magazine, with the ever-immaculate Madonna on the cover!

Madonna US Elle May 08
from frillr.com

Flip to page 212 and see my beloved gloPrecision eye pencils named as the best eyeliner in their Green Stars makeup feature.

gloPrecision eye pencil
from dermstore.com

They cited that these pencils "contain finely crushed minerals for supervelvety, high-impact colour." I love them because they come in great colours (black, black-brown, brown, charcoal, peach, plum, deep olive, antique gold, silver lilac) and have excellent staying power. They can go on very precisely and intense, or you can smudge them out with the smudger on the other end of the pencil to create a softer effect. The glominerals line also has great lip and brow pencils, too!

Wednesday, April 30, 2008

gloLip plumpers - love that tingle!

Lip plumping products are a new niche in the cosmetics market that has exploded in recent years. And for good reason, too! Who doesn't want a bigger, more luscious looking pout?

Many lip plumping products are based on capsaicin (chili pepper extract), which gives them their tingly sensation. They work to temporarily plump up your lips by increasing blood flow. This increase in blood flow gives your lips a deeper, naturally flushed tone, as well.

gloLip Plumper colourless
Colourless gloLip plumper image from gloskincare.com

There is a great lip plumper from glominerals called gloLip plumper. It is capsaicin based, and really gives a nice plumping effect. When I first tried it, I was actually quite surprised because I had previous experience with DuWop's Lip Venom and Too Faced's Lip Injection, which didn't have nearly the same kick. It may take a second to get used to that tingling sensation (especially if you've never tried a lip plumper), but it's so worth it for the end result!

gloLip Plumpers tinted
Tinted gloLip plumper image from gloskincare.com

There is a colourless gloLip plumper, which is great to use by itself or under lip liner, lipstick, or another gloss. They have also put out two new coloured formulas for spring, a coppery-bronze shade and a sheer bright pink. They are both super pretty and deliver that plumping kick, too!

Friday, April 25, 2008

video - 2 makeup tips to update your look for spring

We have a cute video up now on Youtube about 2 quick tips to update your eye makeup look for spring. Check it out!

Wednesday, April 23, 2008

Making the most of your eye makeup

Although soft neutrals are a safe and easy way to do up your eyes, we are moving into a season that features bolder colour picks for eyes. There are many options out there to suit all eye colours and levels of daring, from purples and pinks, to greens, blues and even yellow!

You don't necessarily need to wear these colours in a heavy-handed way - a wash of colour over your mobile lid (the part of your eyelid that moves when you blink) with a healthy dose of mascara can look great.

One BIG trick to keeping these colours looking true is to prep your eyelids before you apply the chosen colour. Especially when doing the pastel colours that are so big for spring, you want to prep your eyelids to ensure that the colour reads right on the lid, blends well and that it lasts.

Have you heard of an eyelid primer? These are creamy products (usually in pot or stick form) that you can apply after you moisturize and before your concealer in order to really make your eye makeup adhere to the lid and stay put. Eyelid primers also really help colours stay true and stay where you put them (nothing like migrating colour to ruin your pretty spring look). The gloLid primer from gloMinerals is really easy to apply, simply smooth on a thin layer over your upper and lower lids with either a brush or your finger. It helps smooth that crepiness and erases all those little blood vessels that otherwise show through your eye makeup. For those of you who are like me and often get greasy eyelids (especially in this warmer than usual weather), eyelid primers are a miracle.

gloLid primer
from dermstore.com

Another way to prep your eyelids is with a careful application of foundation and powder. Again, this helps to create an even-looking base for colour to be applied (no pesky vessels here). It also helps take down the shine and allows the colours to blend well. Please note that applying powder to the eye area can be the opposite of flattering if you apply too much. Try to avoid the undereye area when applying powder, as it can highlight and even create an uneven texture if you are heavy-handed.

Friday, April 18, 2008

brushes - creating the perfect canvas

I have been getting quite a few questions lately on the brushes I use to create the flawless canvas with our mineral formulas.

I am a big fan of wearing as little foundation/base as possible for your skin concerns - it looks the most fresh and flattering. I really like our gloMinerals gloLoose bases and gloPressed bases for virtually everyone, because they offer flexible coverage, last all day and make you look like you have perfect skin (I kid you not!). Wearing a heavy, full-coverage foundation looks especially harsh and aging in the bright light of the warmer months, not to mention the fact that it usually feels awful in the heat and slides off as the day progresses!

So, where to begin? After you have prepped, moisturized/sunscreened and possibly primed the skin, I like to start with spot concealing. My favourite brush for this is the gloMinerals camouflage brush because it allows you to get everything. You can spot conceal with the narrow side of the brush, smooth on more with the flat side, and feather your edges as well (VERY important for imperceptible coverage). It is also made of synthetic fibres, meaning that your creamy concealer will slip more readily off the brush and less is wasted.

gloMinerals camouflage brush
gloMinerals camouflage brush, from glominerals.com

Next, I like to apply the chosen mineral powder foundation (generally, pressed for oily skin, loose for normal to dry or mature). My favourite brush to apply the foundation base is called the gloMinerals ultra brush. It has a nice flat-top bristle pack with good density, a medium-large size and natural fibres. It is soft but sturdy and offers the best control for these foundations, in my opinion. I can even use the edges of the bristle pack to get along the sides of the nose or any other small areas. I like to use it to blend the foundation once I have deposited the powder off the brush, too.

gloMinerals ultra brush
gloMinerals ultra brush, from glominerals.com

Finally, I like to do some blush, perhaps some bronzer and/or finishing powder. My go-to brush for all these products is the gloMinerals powder brush. It has natural fibres as well, a softer oval bristle pack and longer fibres to diffuse the colour and blend beautifully. Although it is called a powder brush, I really like to use it on the cheek area because it allows you to create the beautiful washes of colour that look so pretty, plus it makes for seamless blending.

gloMinerals powder brush
gloMinerals powder brush, from glominerals.com

In many months of use, I have found these brushes to be of great quality as well, holding on to their fibres (although every brush sheds a little when it is new), standing up to meticulous regular cleanings and feeling great in the hand.

Wednesday, April 9, 2008

In Times of Tears - Making Your Makeup Last

Have an event coming up that you are pretty sure will be emotional? I know lots of people that have said, "Oh, I won't be crying at this wedding!" I bet. Even the best laid plans for holding back your tears are out the window as soon as you are around people, caught up in the moment.

Photobucket
from dailymail.co.uk

So what to do? The biggest worry of course is your eye makeup. Eyeliner, mascara and dark eyeshadows are all prone to smudging, smearing and running as soon as you get teary eyed. The first big thing to think about is trying to wear as little eye makeup as possible for the situation. You don't want to do a big multicoloured or smokey eye look if you are going to be blotting your eyes constantly.

You also may want to integrate waterproof or water-resistant formulas into your makeup routine for the day of the event. Waterproof mascara may be something you already have used, and if you have one that works for you then that should be part of your arsenal. There are also makeup sealing products, like Benefit SheLaq, that you can brush on over your normal makeup to seal it (eyes, eyebrows, lips). You need to be a little careful with these kinds of products until you are familiar with them, as they can really sting if you get them into your eyes. Practice with these if you want to use them. If you are worried, do a run through of your makeup look a few days in advance to make sure it looks good and stays in place. Try cutting some onions or watching a tearjerker.

One great trick I have for creating beautiful eyelashes with low maintenance is to use full strip eyelashes INSTEAD OF MASCARA. Make sure you take your time and use a good eyelash glue (Duo Adhesive from MAC is great, just seal it with shadow to disguise it). Curl your own eyelashes before you put your false lashes on so that they blend into the strip more easily, or if you are really careful you can curl them after (and I mean REALLY CAREFUL). You can use a mini eyelash curler to make sure all the little lashes are blended into the strip. If you have blonde/light coloured eyelashes, try black-brown strip eyelashes, and you may want to add on a coat over top of a good, non-clumping waterproof mascara so that they blend. Even if you need to put on some mascara to disguise your lashes with the false strip, you will need much less to get that same impact, so less worries for running/smearing.

Wednesday, March 26, 2008

New Allure Cover - Some Bad Blush

What's with Mariah Carey's blush on the new (April 2008) Allure cover?

Allure Mariah April 08
Image from allure.com

It looks like she has some peachy beige blush on, which would look fabulous except for the fact that it was applied in such an unflattering place!

A few quick rules of thumb with blush and wanting to keep the look natural and flattering:

-SKIP THE SKI SLOPES! Please don't put your blush on this way. Especially not with colour, as demonstrated by the above cover, because it looks strange. The puckering-mouth, ski-slope-under-the-cheeks method is a contouring technique. Use skinlike tones (beige/taupe tones and foundation colours) to contour your face, because they mimic the actual tones of the shading you are trying to accentuate.

-SMILE. Make a big smile at yourself in the mirror. See the fleshy pad that pops out under your eyes when you do this? That's the apple of your cheek. Keep your blush colour in this area, and diffuse it out and upward. A great trick for a nice uplifting effect is to keep your blush to the outer two thirds of the apples of your cheeks, blending up and out.

-USE THE PROPER TOOL. The brush that I like to use to get a great daytime blush application is actually a medium sized powder brush. I find that many blush brushes are too small to effectively diffuse colour, although some powder brushes these days are way too big to use for the cheek alone. Look for a brush that is about the size of the apple of your cheek, as anything too big will be messy and anything too small will be streaky.

-LESS IS MORE. Blush (especially in the daytime) should bring a subtle vibrancy and life to your face. The current aesthetic for blush looks leans towards a lit-from-within glow, which is a far cry from the overt rouged looks of eras past. It's all about fooling the eye - go ahead and wear your (barely perceptible) blush, just don't let your screaming blush wear you!

Wednesday, March 19, 2008

Eyebrows

Anyone that knows me well knows that I have grown to become quite obsessed with eyebrows.

Eyebrows really are the frame for the face, and properly shaped and groomed eyebrows can make all the difference to your look. Although shapes and styles have changed throughout the ages, there are some key features to eyebrow looks right now that can make your look more current and modern.

Photobucket
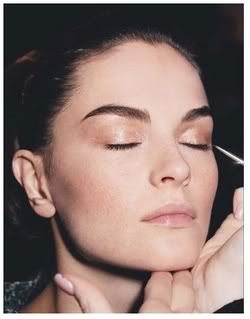
The perfect modern brow, courtesy of allure.com

First new rule: LET YOUR BROWS GROW.

I know how easy it is to simply stick to a look you feel has been working for you, regardless of how long you have been doing it. Brows these days are thicker, fuller and shaped. Do not be afraid when you hear thick brows, these are not the unkempt look of the '80s.

Secondly, PAY ATTENTION TO YOUR ARCH.

We have all read this and that about how to find your arch and groom your eyebrows properly, but the truth is that the most current look for brows is groomed under a completely different set of measurements. Take for example the positioning of the arch is relation to the eye. Notice that the arch is pushed out from the centre of the face. In relation to the proportions of the brow, the arch is now starting at the outer third of the brow, and is not necessarily groomed in relation to the position of the iris (as previously mentioned in most brow grooming guides).

Thirdly, MODIFY THE SHAPE.

The most striking and contemporary shape to the brows is one that has a smoother, more fluid underline that transitions gradually from the beginning through to the arch at about two thirds out, and then gradually curves and tapers to form the end. Pay attention to the positioning of the endpoint in relation to the lowest point on the inner edge of your brow, above the inner corner of your eye. Notice that the inner corner is lower than the endpoint. If a level horizontal line was drawn across the eye touching the lower inner corner of the brows, the endpoint of the brow would be higher than this line. This creates a nice uplifting effect and really opens up the eye. I know it can be a little hard to achieve this raised endpoint, but please at least keep it level with the lower inner corner, as it will keep you from looking tired or sad.

Here's another contemporary brow, illustrating the perspective when viewing the face straight on:
Photobucket
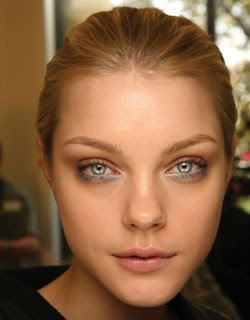
The amazing Jessica Stam, from style.com

Next time you take a look at a recent magazine, take a second to really look at the eyebrows. It is easy to pass them up when you aren't especially looking out for them, but take a second to analyze the new shapes that are out there. You'll see what I mean...

Thursday, February 14, 2008

Highlighting the Eye

I want to introduce you to a little secret. It is very simple to do, but it works WONDERS for anyone wanting to appear more alert, more awake, and more alive.

It's a little trick called highlighting the eye. Many of you may already do it - you know, that little pop of a light shadow colour you put on your browbone. But there is one more place that is key for achieving that bright eyed look, the inner corners of the eye. Placing just a little bit of highlight colour right there can make all the difference in the world. Make sure that you are putting your highlight right on the inner corner without sweeping it down into your undereye concealer. It won't look right if you sweep it too low, particularly if you have puffiness under the eye, as any extra light-catching will make those bags look worse!

Great highlight colours can be found with regular eyeshadows, like a simple pearly vanilla or soft white shade. The pearly ones actually do work well on mature lids, provided that they are genuinely pearly/opalescent and NOT GLITTER. Fine micro particles of pearlescence are the key - they help scatter the light in that area and really brighten the inner corners. Use a small brush with a soft, rounded bristle pack and a tapered tip to make it super easy to reach and effortless to blend.

My two favourite colours are gloMinerals single eyeshadow in Diamond (a soft vanilla with pearlescence that works for practically everyone) and Revlon eyeshadow in Pure Pearl (more white and great for fair skin).

Try it yourself and be amazed at the difference this one little step does!

Wednesday, January 30, 2008

Concealers Part 1 - Under Eye

Concealers are the backbone of any makeup look, be it natural or full-on glamour. One basic use that everyone appreciates having concealer for is under the eyes.

Although some have more issues with their under eye area than others, everyone can enjoy the instant lift and pop that a good under eye concealer can give. Basically, a great under eye concealer will give you the pick me up that lets others believe that you had eight hours of sleep last night.

Of course there is basic heavy concealer, the kind that is great for blemishes or discolourations but may be too much for the under eye - no one wants to look crepey and uneven, especially not under the eyes.

Now there are newer formulations made for use in this area, with a smoother, thinner consistency AND light diffusing particles. They are made to camouflage darkness by reflecting light in the (usually shadowed) area around the inner corners of your eyes. A fabulous optical (pun intended) illusion!

I have used one called Touche Eclat from Yves Saint Laurent Beaute, a highlight concealer with light diffusing properties. It has a very thin consistency and comes in a click-pen format, with a brush tip.

There is also a new product from gloMinerals called gloBrightener highlight concealer. It is a click pen with a sponge tip, so you can just smooth it over the area and blend with your ring finger, no brush needed. It has a bit more coverage than the Touche Eclat, with light diffusing properties as well.

Photobucket
Image courtesy of gloMinerals.

I have taken a picture so that you can see its magic in action. It is quite nice as it gives subtle coverage and light diffusion, with a creamy texture that hydrates and prevents crepiness.

Photobucket
As you can see, I have gloBrightener on the left side, and no concealer on the right side. It conceals and evens the tone under my eye without looking cakey or overdone. Love it!

P.S. Please excuse the unkempt brows, but check back for my upcoming posts on my experiments with them. I have been in serious need of brow rehab, so I have locked up my tweezers and started trying some new methods to regrow... once testing is up, expect a report from me!

Wednesday, January 23, 2008

The 411 on Mascaras

Mascaras have come a long way from the original formulation of coal dust and petroleum jelly in 1913. There is an endless variety of formulas and colours out there, but the main desire that each addresses is essentially the same - to make your lashes look more prominent, more defined, just MORE OOMPH!

Although there are many wild and wacky mascaras with bright colours, multiple steps (primers, lash "builders" and the like), many will get all their mascara needs answered with one great tube of well-matched mascara.

One of the first questions to ask yourself is, "Do I want length or do I want volume?" If you aren't sure, look at your lashes. Do you have lots of little, short lashes? You may prefer a lengthening mascara, seeing as you have lots of lashes, but they aren't that long. On the other hand, if you have fewer but longer lashes, you may want a volumizing mascara. A volumizing mascara will give your longer lashes more presence, and keep them from looking sparse. Many mascaras do a little bit of both, but most formulas will focus on either lengthening or volumizing.

Another thing to look for is how curly or straight your lashes are. I have fairly straight lashes, so an eyelash curler makes all the difference to the final effect of my mascara. If you are intimidated by an eyelash curler, please just pick up one (they are sold in every drugstore now) and practice. It makes a world of difference to virtually everybody. Taking the extra minute to curl you lashes in the morning ensures that they look great all day, because your mascara helps hold the curl throughout the day. Some mascaras are "curling formulas" but nothing takes the place of curling with an eyelash curler.

In terms of colour, most mascaras come in black, brown, or something in between. If your hair is dark, black mascara will give nice definition, day or night. For blondes wanting subtle definition, a brown mascara works well. Mascaras in a black-brown colour are great for most people during the daytime, and are a pretty fail-safe option for everyone.

Basic mascaras may also come in blue, which is usually a dark navy tone. This is actually a really nice look for anyone with blue-green or hazel eyes, as it really makes the green tone in eyes pop. The effect is very nice, but it is hardly a look that screams, "I'm wearing coloured mascara." Try it if you have those in-between coloured eyes.

Waterproof mascara is not necessary for everyday wear, unless you are a swimmer or cut onions daily. It can be very drying for your lashes, and difficult to remove. Try to save this only for occasions when you need it.

Friday, January 18, 2008

Prime Time for Primers

Ever wonder how someone's makeup can stay on flawlessly throughout the day? Have you ever asked someone their trick to flawless foundation and heard the response primer and felt perplexed?

Primers may seem like just an extra step after moisturizer and before foundation, but they are a gift from heaven for anyone that needs staying power from their makeup. Silicone based primers are especially great for normal to dry skin types, or those suffering from, dare I say it - WINTER SKIN!

The way a primer works is to create a smooth, even canvas over which you apply foundation. Primers help to disguise pores, fine lines, or uneven texture, and help your foundation adhere to the skin and stay put. You might have heard of Smashbox primer, a great silicone based primer that creates a nice smooth effect. Another fabulous silicone based primer is gloMinerals gloFace Primer. Although I have found that these are both very similar in consistency and effect, the gloFace Primer has the added benefit of vitamin K, which is great for toning and tightening.

Photobucket

If you want that fabulous, flawless finish that lasts all day (and all night), try a primer!

Wednesday, January 16, 2008

Get glowing all over with gloDust!

Feeling a little lacklustre? Maybe a little dull?

I don't know about you, but sometimes I just need a beauty pick-me-up. Mine comes in the form of a beautiful shimmery dust called gloDust. It is really quite amazing, because it can be used in so many ways. You can dust it on in its powder form to highlight areas like the shoulders, decollete or browbones. It can also be mixed into lotion and applied as an all-over shimmer lotion. You can also use gloDust in your hair! You can try it a la Marlene Dietrich and sprinkle a little powder into your hair. You can also mix it into a styling lotion or shine serum and work it in that way.

Photobucket
From left to right, gloMinerals silver gloDust, gold gloDust, and bronze gloDust

It comes in three colours - silver, gold, and bronze. The silver is quite frosty. The gold is very subtle and looks great on everybody, including pale me. The bronze is the deepest and most potent, and would be great mixed into a styling lotion on brown hair or as a highlighter on darker skintones.

Saturday, January 12, 2008

Spring Trends for 2008

I know, spring seems like it is a long way away when you live in the Great White North and it is the middle of January!

Both fashion lines and cosmetic companies have come out with their new spring looks already, and I have seen a big trend: BLUE.

Sounds like scary stuff right? Well, it can be, especially in its most ghastly incarnations. What if you want to try it for real life?

Somehow these runway trends seem lost in translation...

Photobucket
Louis Vuitton S/S 08 - so charming at a garden party, don't you think?
Image courtesy of style.com
LV SS08 Blue Lips
Louis Vuitton S/S 08 - this is a real keeper, I know every woman wants to look like a frozen corpse! What? Don't you!?
Image courtesy of style.com
Photobucket
John Galliano S/S 08 - nothing like being bright eyed and bushy tailed, but to look blue eyeshadowed and bushy eyelashed?
Image courtesy of style.com
Photobucket
Giambattista Valli S/S 08 - now this is just the pits, ruined such a perfectly wearable spring mouth....
Image courtesy of style.com

If you want to experiment (or re-experiment, as the case may be) with blue for everyday wear, it goes without saying that you should keep it to the eyes. But not just the eyes, keep it to the lashline. A subtle change to a bit of blue eyeliner (sapphire or blue suede cream eyeliner from gloMinerals) placed right along the upper lashline, with a soft light neutral shadow all over the lid (gloMinerals banana) and a healthy dose of mascara would be pretty AND wearable. You could even play up the blue if you wished with an extra swipe of a brighter blue shadow over the eyeliner, just along the lashline (gloMinerals shadow in Ocean is a beautiful light turquoise blue).

Photobucket
Our rendition of a great simple blue eye look for spring.
Thanks Laura for being my lovely model!

BLUE is not just a colour best left in the 80s, nor should it be doomed to be only a club-kid look or the name of an annoying dance song. It can look fresh and pretty, and it looks especially great on blue-eyed blondes wanting to perk up their eyes.